Views: 0 Author: Site Editor Publish Time: 2026-08-04 Origin: Site
Mini PCs offer a remarkably compact footprint for modern workspaces. However, maximizing their productivity often requires a dual-screen configuration. Relying on a single monitor frequently bottlenecks professional workflows. Windows 11 natively supports multiple displays beautifully. Yet, the hardware constraints of micro-form-factor PCs introduce unique setup variables. You must navigate limited physical ports, shared integrated graphics, and strict power limits. They require a more thoughtful approach than standard desktop towers. A reliable mini pc dual monitor setup requires matching the right physical connections with the correct Windows display protocols. In this guide, you will learn exactly how to configure your devices for optimal performance. We will walk you through assessing your hardware and selecting the proper cables. Finally, we will cover the precise Windows 11 settings needed to ensure a flawless multi-screen experience.
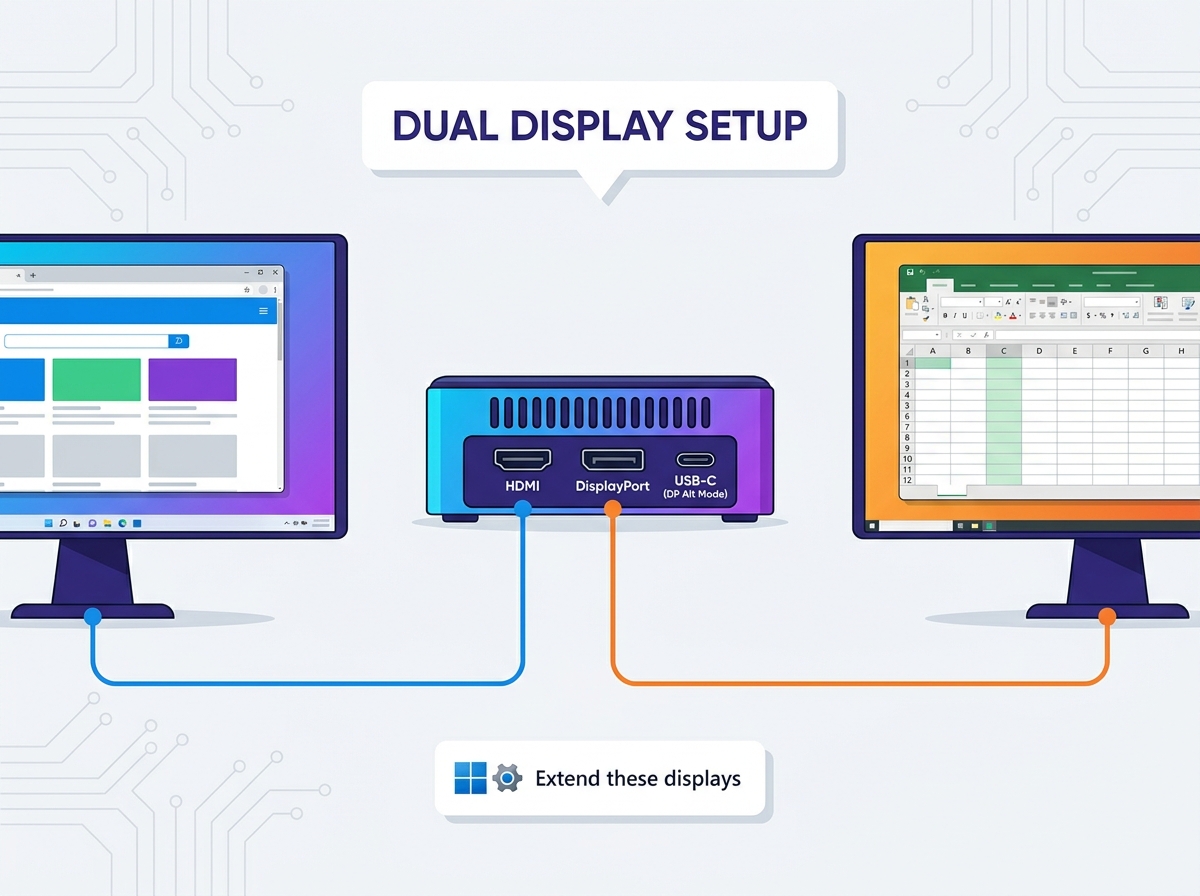
Verify your Mini PC’s exact video output capabilities (HDMI, DisplayPort, or USB-C with DP Alt Mode) before purchasing cables.
Avoid passive adapters when mixing port types; active adapters are necessary for stable dual-display signals on low-power devices.
Windows 11 configuration requires navigating to System > Display and selecting the "Extend these displays" protocol.
Integrated GPUs (common in Mini PCs) share system RAM; running dual 4K monitors may require adjusting refresh rates or scaling settings to maintain performance.
You cannot build a functional dual-monitor workstation without understanding your physical hardware. Micro-form-factor computers utilize highly integrated motherboards. Manufacturers must compromise on physical port space. You must map out your physical interfaces first. Most modern mini PCs feature a specific combination of video outputs. You will typically find HDMI, DisplayPort (DP), or USB-C connections.
Identifying your native ports dictates your next steps. Inspect the back and front panels of your computer. Look for the distinct rectangular HDMI ports or the slightly asymmetrical DisplayPort connections. Some devices utilize Mini DisplayPort. Noting these exact shapes prevents incompatible cable purchases.
The USB-C port introduces a massive variable. Many users mistakenly assume any USB-C port supports video output. Standard USB-C data ports will not output a video signal without a DisplayLink driver. You must verify your device supports "DisplayPort Alternate Mode" (DP Alt Mode) or Thunderbolt 3/4. Consult your manufacturer specification sheet. If the USB-C port lacks the DP or Thunderbolt logo, it likely only handles basic data transfer.
Bandwidth and GPU limitations present another critical hurdle. Mini PCs rely heavily on integrated graphics. Common examples include Intel Iris Xe and AMD Radeon Vega. These chips share your system RAM. They do not have dedicated video memory. Pushing two 4K screens at 60Hz requires significant processing power. It also requires specific port standards. You need HDMI 2.0 or higher. Alternatively, you need DisplayPort 1.4 or higher. Older HDMI 1.4 ports simply lack the bandwidth for dual 4K at smooth refresh rates. Frame your business expectations around these hardware constraints.
Choosing the correct wiring infrastructure determines system stability. You want to avoid complex adapter chains whenever possible. Direct connections represent the ultimate best practice. Advocate for native port-to-port connections. An HDMI-to-HDMI or DP-to-DP cable minimizes signal degradation. Direct cables also prevent annoying hardware handshake failures during boot sequences.
Unfortunately, mismatched ports frequently require adapters. You must understand the difference between active and passive adapters. Passive adapters merely change the plug shape. They rely on the computer to output the correct signal type. Active adapters contain tiny integrated circuits. These chips actively convert the video signal from one format to another.
If you convert DisplayPort to HDMI, we strongly recommend active adapters for Mini PCs. Converting signals drains power. Active adapters ensure the integrated GPU isn't overworked by voltage conversion. Low-power micro PCs struggle to push stable signals through passive adapters across two displays.
Desk space matters when building a compact workstation. Docking stations and daisy-chaining offer elegant solutions. You should evaluate MST (Multi-Stream Transport) capabilities. DisplayPort allows you to link one monitor to another sequentially. This protocol drastically reduces cable clutter. You only run one cable from the computer to the first monitor. You then run a second cable between the monitors.
We outlined the common connection protocols below to simplify your decision process:
Connection Method | Primary Use Case | Hardware Impact |
|---|---|---|
Native Cable (e.g., HDMI to HDMI) | Matching computer and monitor ports | Zero performance loss; lowest GPU strain |
Active Adapter | Converting DP to HDMI on low-power PCs | Maintains signal integrity; requires slightly more USB power |
Passive Adapter | Short runs on high-power desktop towers | High risk of signal dropouts on mini PCs |
MST Daisy-Chaining | Connecting two DP-enabled monitors | Reduces clutter; requires DisplayPort 1.2 or higher |
Software configuration relies on proper physical initialization. Your boot sequence matters. We recommend specific physical connection protocols to avoid detection errors. Connect both monitors to the computer before powering it on. Power on the monitors first. Finally, power on the computer. This sequence forces the BIOS/UEFI to execute a complete hardware handshake. It registers both displays before Windows even loads.
Once Windows 11 boots, you must configure the operating system parameters. The native settings menu offers everything you need. Follow these exact steps:
Right-click an empty space on your desktop.
Select Display settings from the context menu.
Navigate through Settings > System > Display.
Look for two numbered monitor icons at the top.
Use the "Detect" button if the second screen remains unresponsive.
Scroll down to the multiple displays section.
Select "Extend these displays" from the dropdown menu.
Choosing "Extend" creates a massive continuous desktop. This setup maximizes productivity. You must now align the physical layout digitally. Windows does not know how you arranged the monitors on your desk. Click and drag the numbered monitor icons in the Windows 11 UI. Match them to your exact physical arrangement. Align the top edges carefully. This alignment ensures smooth mouse tracking across the bezels.
Finally, establish your primary display assignment. Select your preferred main monitor by clicking its icon. Scroll down and check the box labeled "Make this my main display". This action locks your system tray, default taskbar, and primary desktop shortcuts to your preferred screen.
Connecting the screens represents only half the battle. You must optimize the visual output for daily comfort. Resolution matching prevents eye strain. Many users combine mismatched monitors. You might pair a new 1440p monitor alongside an older 1080p display. You must configure native resolutions for each screen independently. Selecting a non-native resolution causes severe text blurriness. Always choose the resolution marked "(Recommended)" in the display settings dropdown.
Windows 11 scaling prevents interface sizing issues. A 27-inch 4K monitor displays tiny text at 100% scale. A 24-inch 1080p monitor displays normal text at 100% scale. Dragging a window between them causes a jarring size shift. You must adjust the "Scale" percentage individually per monitor. Set the 4K screen to 150%. Keep the 1080p screen at 100%. This careful adjustment ensures uniform UI sizing across different screen dimensions.
Refresh rate management directly impacts system smoothness. Windows occasionally selects conservative defaults. Dual monitors frequently default to 30Hz on lower-end mini PCs. A 30Hz refresh rate causes noticeable mouse lag. It makes window dragging feel sluggish. Address this implementation risk immediately.
Scroll down in the Display menu.
Click on Advanced display.
Select your target monitor from the top dropdown menu.
Locate the Choose a refresh rate option.
Select 60Hz from the list.
You can manually force 60Hz provided your cable bandwidth supports it. If 60Hz does not appear, your hardware bottleneck restricts it. You likely need a newer cable or an active adapter to unlock higher refresh rates.
Even perfect setups occasionally malfunction. You will likely encounter display errors during your device lifecycle. The "No Signal" or black screen error frustrates many users. Do not panic. Execute a step-by-step diagnostic. First, perform a physical cable check. Ensure every connection sits firmly in its socket. Next, verify the input source via your monitor OSD (On-Screen Display). Monitors sometimes fail to auto-detect the active port. Finally, run driver updates via Device Manager. Outdated Intel or AMD graphics drivers frequently break multi-monitor handshakes.
Flickering screens present a different challenge. You might experience intermittent signal drops. Users often blame the computer. However, attribute this issue to bandwidth limitations or cheap unshielded cables. Micro PCs lack the voltage overhead to push signals through bad wiring. Discard cheap generic cords. We strongly recommend purchasing VESA-certified cables. Certified wiring guarantees the necessary shielding and bandwidth for stable video transmission.
Sleep mode wake issues plague modern operating systems. Windows 11 has a known bug. Secondary monitors frequently fail to wake up after the computer enters sleep mode. You click your mouse, but the second screen stays black. You can solve this annoying behavior. The issue usually stems from power-saving features. You should disable "ULPS" (Ultra-Low Power State) in your specific graphics drivers. You can access these settings through the AMD Adrenalin or Intel Command Center applications. If the problem persists, check your manufacturer website. Updating your system BIOS often resolves deep-level ACPI wake failures.
Establishing a mini pc dual monitor setup transforms a basic workstation into a productivity powerhouse. The process remains highly effective for business environments when you respect underlying hardware limitations. Success depends on careful preparation. You must map your native ports accurately. You must select appropriate active adapters. You must configure Windows 11 settings thoughtfully.
Consider your daily workflow requirements carefully. If you plan on upgrading or buying new equipment, apply smart shortlisting logic. Prioritize micro computers featuring at least two dedicated, high-bandwidth video ports. Look for HDMI 2.1 or DisplayPort 1.4 specifications natively built into the chassis. This foresight helps you avoid relying on fragile dongles or expensive docking stations.
Take action today to improve your computing environment. Boot up your current machine. Verify your device's integrated GPU specifications. Check your physical cable connections against our recommendations. If your current hardware lacks the necessary outputs, browse a curated list of dual-screen capable models to elevate your desk setup.
A: Most modern units can comfortably drive two screens. However, physical port availability dictates your setup method. You must determine whether you need native cables, active adapters, or USB docks. Always check for explicit dual-display support in the manufacturer specification sheet before purchasing accessories.
A: For general office work, no. You will not notice performance degradation. However, driving twice the pixel count requires more integrated GPU memory and system RAM. This shared resource allocation may impact intensive applications. Heavy graphical tasks or gaming will experience reduced frame rates across multiple screens.
A: You can only achieve this using a dedicated DisplayLink adapter. This hardware requires specific proprietary drivers. It also consumes vital CPU resources to compress and transmit the video signal. This method introduces noticeable latency. It remains suboptimal for high-definition video playback or gaming.